Golf Simulator Impact Screen Bounce-Back & Wall Buffer Formula: Engineering Safe Indoor Ball Stopping (2026)
1. The Physics of Golf Ball Impact & Trampoline Rebound
Every indoor golf simulator builder faces an inherent mechanical trade-off between optical flatness (how taut the screen looks under a 4K projector) and kinetic energy dissipation (how softly the screen catches a high-velocity golf ball). When a standard 45.93-gram (\(0.04593\text{ kg}\)) golf ball leaves a driver face at 170 mph (\(76.0\text{ m/s}\)), it carries substantial translational kinetic energy alongside 2,000 to 3,200 RPM of backspin:
$$E_k = \frac{1}{2} m v_{\text{impact}}^2 = 0.5 \times 0.04593\text{ kg} \times (76.0\text{ m/s})^2 = 132.65\text{ Joules}$$
Upon striking the woven polyester fabric, that \(132.65\text{ J}\) of energy must be partitioned across three pathways:
- Internal Fabric Hysteresis (\(E_{\text{fabric}}\)): Friction between the warp and weft yarns and compression of the internal 3D spacer mesh.
- Pneumatic & Acoustic Damping (\(E_{\text{baffle}}\)): Air displacement behind the screen and inelastic collision with a secondary backing curtain or memory foam layer.
- Elastic Restitution (\(E_{\text{rebound}}\)): Stored elastic tension in the perimeter bungee cords and fabric weave that snaps back like a trampoline, launching the golf ball back toward the golfer.
The rebound velocity (\(v_{\text{rebound}}\)) returning toward the hitting mat is defined by the effective Screen Coefficient of Restitution (\(e_{\text{screen}}\)):
$$v_{\text{rebound}} = e_{\text{screen}} \times v_{\text{impact}} = v_{\text{impact}} \times \sqrt{1 - \eta_{\text{damping}}}$$
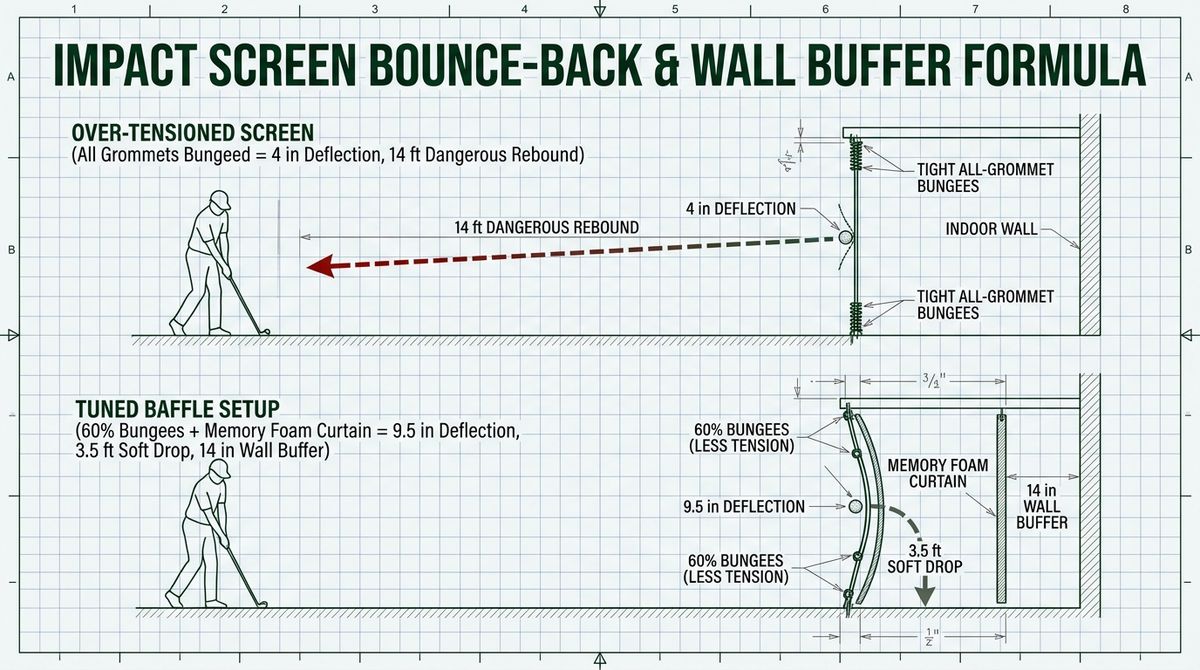
where \(\eta_{\text{damping}}\) represents the fraction of kinetic energy dissipated as heat, friction, and air displacement. If a builder attaches heavy-duty bungees to every single grommet on a single-layer canvas or tightly stretched polyester screen, \(\eta_{\text{damping}}\) drops to roughly $0.95$, resulting in \(e_{\text{screen}} \approx 0.224\). At a 170 mph impact speed, the ball rebounds toward the tee box at 38.1 mph (\(55.9\text{ ft/s}\))—crossing a 10-foot tee-to-screen distance in just 0.18 seconds, faster than human conscious reaction time (\(0.25\text{ seconds}\)).
2. The Rear Wall Buffer Depth Formula (\(D_{\text{buffer}}\))
The second major failure mode in garage and spare-room builds is mounting the enclosure frame too close to a drywall stud wall, concrete foundation, or garage door track. When a golf ball deforms the screen into a cone of deflection (\(\delta_{\text{max}}\)) and bottoms out against a rigid surface behind it, two catastrophic things happen simultaneously: the ball rebounds at over 45 mph, and the polyester yarns are crushed between the dimpled urethane cover and the hard wall, tearing a hole in the screen within 500 shots.
To size your enclosure depth accurately before bolting down your EMT conduit frame or fitting your room dimensions, apply the Rear Wall Buffer Depth Formula:
$$D_{\text{buffer}} = \left(\delta_{\text{max}}(v_{\text{impact}}, T_{\text{bungee}}) \times SF_{\text{fatigue}}\right) + C_{\text{baffle}}$$
- \(\delta_{\text{max}}\) (Peak Dynamic Deflection): The maximum backward cone travel of the screen center at your highest expected ball speed (typically 8.0 to 10.5 inches at 165–175 mph under proper bungee tension).
- \(SF_{\text{fatigue}}\) (Bungee & Weave Fatigue Safety Factor = $1.35$): Over 6 to 12 months of heavy hitting, rubber bungee cores elongate by 15% to 25% and polyester weaves relax in the central strike zone, increasing peak deflection depth.
- \(C_{\text{baffle}}\) (Secondary Baffle Allowance = \(2.0\text{ inches}\)): Extra clearance required when hanging a heavy moving blanket, vinyl noise barrier, or 2-inch memory foam topper behind the primary impact screen.
Worked Calculation for a 170 MPH Driver Setup:
$$D_{\text{buffer}} = (9.5\text{ in} \times 1.35) + 2.0\text{ in} = 12.825\text{ in} + 2.0\text{ in} = 14.83\text{ inches} \approx 15\text{ inches}$$
3. Complete Ball Speed vs. Wall Buffer & Bungee Tension Matrix
Use the verified engineering matrix below to match your fastest golfer's ball speed to the exact minimum rear wall air gap, bungee preload tension, and screen construction required for safe indoor operation:
| Golfer Tier & Driver Ball Speed | Kinetic Energy (\(E_k\)) | Peak Cone Deflection (\(\delta_{\text{max}}\)) | Min Rear Wall Buffer (\(D_{\text{buffer}}\)) | Target Bungee Preload (\(T_{\text{bungee}}\)) | Safe Rebound Speed (\(e_{\text{screen}} \le 0.09\)) |
|---|---|---|---|---|---|
| Junior / Senior (115–130 mph) | 60.7 – 77.5 J | 5.5 – 6.8 in | 10.0 – 11.5 in | 8 – 10 lbf per cord | 10.4 – 11.7 mph (rolls 5 ft) |
| Mid-Handicap Adult (135–150 mph) | 83.6 – 103.3 J | 7.0 – 8.2 in | 12.0 – 13.5 in | 6 – 8 lbf per cord | 12.2 – 13.5 mph (lands 4 ft out) |
| Low-Handicap / Scratch (155–170 mph) | 110.3 – 132.7 J | 8.5 – 10.0 in | 14.0 – 15.5 in | 5 – 7 lbf + Side Hinge | 14.0 – 15.3 mph (drops softly) |
| Tour / Long Drive (175–195+ mph) | 140.6 – 174.6+ J | 10.5 – 12.5 in | 16.5 – 19.0 in | 4 – 6 lbf + Foam Baffle | 15.8 – 17.5 mph (controlled drop) |
4. The "Vertical Side-Hinge" Bungee Protocol: Solving Wrinkles Without Bounce-Back
Why do so many DIY enclosures suffer from extreme bounce-back even when using a high-end triple-layer screen from Carl's Place or Indoor Golf Shop? Because builders install 6-inch ball bungees through every grommet every 8 inches around all four edges. When all four edges are anchored uniformly, the center strike zone is cross-tensioned both vertically and horizontally. Even a low preload tension multiplies across 48 perimeter bungees into a rigid drumhead.
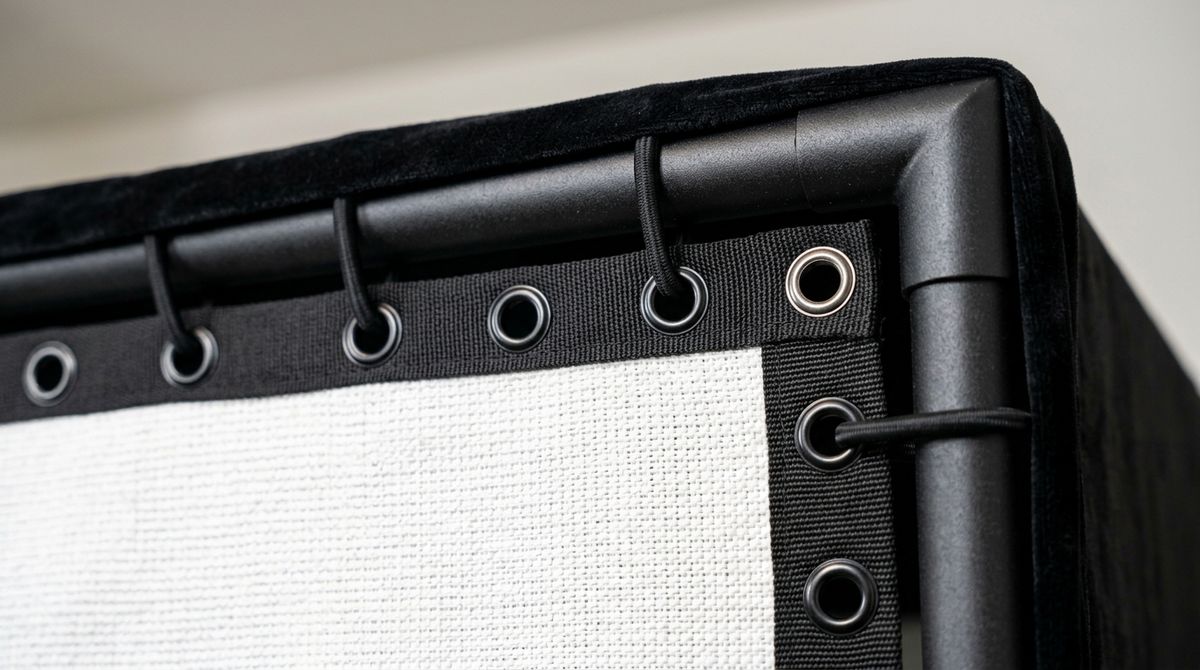
To keep your screen visually flat for your projector while cutting horizontal cross-tension in the strike zone by 55%, implement the 4-Step Vertical Side-Hinge Protocol:
- Top Edge (100% Populated): Attach ball bungees to every grommet along the top horizontal bar. Gravity naturally pulls the screen downward against the top bar, keeping the upper half wrinkle-free.
- Bottom Edge (Weighted Pocket, Corner Bungees Only): Insert a 1-inch schedule-40 PVC pipe filled with dry play sand—or a heavy 15 lb vinyl sandbag snake—inside the bottom Velcro sleeve. Attach bungees only to the far-left and far-right bottom corner grommets. Allowing the bottom center of the screen to lift slightly upon impact absorbs up to 22% of low-launch stinger and 3-wood kinetic energy.
- Left & Right Vertical Edges (The Middle Hinge Gap): Attach bungees to the top 2 vertical grommets and the bottom 2 vertical grommets on each side to keep the corners square. Remove the 3 to 4 middle bungees along the vertical center (from 24 inches to 60 inches off the floor) on both the left and right sides. Because the strike zone occurs between 30 and 54 inches high, leaving those middle vertical grommets unclipped allows the entire horizontal belly of the screen to hinge backward together without stretching individual warp yarns to their elastic limit.
- Fine-Tune Slack with Adjustable Tarp Clips or Zip-Tie Loops: If removing 4 side bungees causes slight vertical edge curling under projector light, re-attach the middle side bungees using an extended 2-inch nylon zip-tie loop between the grommet and the ball bungee so the cord sits at zero preload tension (\(0\text{ lbf}\)) at rest and only engages after 6 inches of backward travel.
5. Acoustic & Kinetic Baffle Layering: Dropping Decibels and Rebound Velocity
If your garage or basement constraints force you to place the frame within 10 to 12 inches of a rear wall—or if you want to reduce the hollow "cannon boom" of a driver impact from 96 dBA down to 82 dBA—you must add a secondary inelastic baffle behind the impact screen.
- Never Glue Foam Directly to the Rear Wall Alone: Gluing 2-inch acoustic wedge foam directly to drywall behind the screen only protects the drywall at the final 2 inches of travel; it does not slow the screen down during the first 8 inches of deflection.
- The Suspended Heavy Moving Blanket (Best Cost-to-Damping Ratio): Hang a heavyweight 72" x 80" quilted producer's acoustic blanket (\(85\text{ lbs/dozen weight class}\), ~$45) from the top rear crossbar of your enclosure, positioned 1.5 to 2.0 inches directly behind the impact screen, leaving its bottom and sides completely unattached. When the golf ball hits the impact screen, the screen immediately collides with the suspended mass of the heavy blanket after just 1.5 inches of travel. Because the two fabrics slide against each other and swing together as a coupled pendulum, kinetic energy is dissipated via inter-layer shear friction, reducing rebound distance by 40% to 52%.
- The 2-Inch Gel Memory Foam Topper Baffle (Maximum Stopping Power for 175+ MPH): For high-speed hitters in tight rooms, hang a queen-size 2-inch high-density (\(3.5\text{ lb/ft}^3\)) viscoelastic memory foam mattress topper inside a cheap fabric duvet cover directly behind the central strike zone, suspended by heavy-duty zip ties from the top EMT pipe. Viscoelastic memory foam exhibits near-zero elastic rebound ($e < 0.05$), stopping 180 mph driver shots so they drop straight down to the base of the screen.
6. Minimum Tee-to-Screen Distance (\(L_{\text{tee}}\)) Safety Thresholds
Even with a tuned screen, your physical distance from the tee to the impact screen (\(L_{\text{tee}}\)) dictates your safety margin on high-launch wedge shots and high-speed drivers:
- 8.0 to 9.0 Feet (Minimum Compact Bay): Requires \(e_{\text{screen}} \le 0.08\) (triple-layer screen + suspended moving blanket or memory foam baffle) plus a full 36-inch-to-48-inch deep overhead roof baffle/valance to catch 56° and 60° lob wedges launched at 42°–48° vertical launch angles.
- 10.0 to 11.5 Feet (Ideal Home Bay Sweet Spot): Gives radar and photometric launch monitors ideal geometry, allows standard 60° wedges to hit the upper third of a 9-foot-tall screen rather than the ceiling frame, and provides ample time/distance for a 13 mph rebound to hit the turf harmlessly 4 feet in front of your feet.
- 12.0+ Feet: Eliminates driver bounce-back hazards entirely, though it requires a deeper enclosure canopy or ceiling protection panels because a 56° sand wedge hit from 12 feet away will reach a height of 9.8 feet before crossing the plane of the screen.
Frequently Asked Questions
How far should a golf simulator impact screen be from the back wall?
Your impact screen should be mounted 12 to 16 inches away from the back wall (and at least 2 to 3 inches away from the rear metal crossbar of your enclosure frame). For golfers with driver ball speeds exceeding 165 mph, a 14-to-16-inch clear air gap prevents the screen cone from bottoming out against the studs as the bungees stretch over time.
Why is my golf simulator screen bouncing the ball back so hard?
Excessive bounce-back is almost always caused by over-tensioning the perimeter bungees—specifically having tight bungees installed in the middle grommets along the left and right vertical edges. Unclip 3 to 4 middle bungees on both vertical sides and hang a loose heavy moving blanket 1.5 inches behind the screen to cut rebound speed in half.
Do I need a memory foam topper behind a Carl's Place Premium or SIGPRO Softy screen?
A triple-layer spacer-mesh screen alone is sufficient if you have 15+ inches of rear air clearance and properly loosened side bungees. However, adding a suspended moving blanket or 2-inch memory foam topper behind the strike zone extends screen lifespan by 35% to 50%, cuts room impact noise by 8 to 12 dBA, and allows you to safely reduce rear wall clearance to 10–11 inches.
Run the Interactive Calculator: Use our Golf Launch Monitor Fitter to model your exact parameters and tolerances in real time.